This documentation page assumes that you have read Creating Level Configuration tutorial and know how to setup level configuration and Grid Level Layout. You will find here more details about working with it.
You can find a demo of Grid Level Selector here.
Grid setup
To create grid layout, initialize new scene as described in the tutorial. Be sure to select Grid as layout.
If you have your scene already initialized with a Panel, please select Tools → Mad Level Manager → Create Grid Layout from the main menu. New object called grid layout should appear. Make sure that this new object is selected and take a look at its inspector:
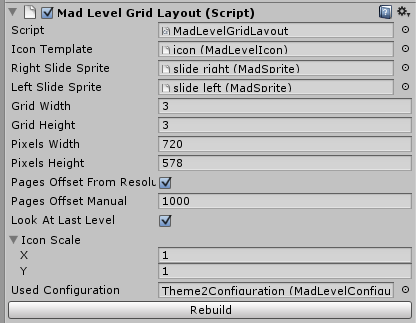
By default it may be filled with example sprites (depending of how you decided to create the layout). Let’s describe what we see here.
- Icon Template – Reference to MadLevelIcon object that will have its own instance for each level. You can use example icons or create your own
- Right/Left Slide Sprite – Reference to MadSprite objects for slide icons. These icons are displayed at the screen edges, and when touch they will move player to previous/next levels page. Slide icons are optional.
- Grid Width/Height – Size of icon grid per page. If there’s more levels than fit on one grid, more pages will be created and slide icons will be displayed.
- Pixels Width/Height – Size of draw area in pixels. How pixels should be resized you can define in the root object (TODO)
- Pages Offset From Resolution – Allows Mad Level Manager to calculate how pages will be away from each other based on screen resolution. In most cases keeping this enabled is the best option.
- Pages Offset Manual – If you decide to disable option above, you can manually set distance between pages (in pixels).
- Look At Last Level – If enabled when player returns to level select screen from playable level, grid will automatically slide to page on which mentioned level icon is present.
- Icon Scale – Allows you to set scale factor for your icon. If icon appears to small or too large, it is the best place to resize it.
- Used Configuration – Configuration that is used to build this level screen. You can switch it anytime. By default currently active configuration (at the time of creation) is set here.
- Rebuild button – You need to hit this button when changes that you applied aren’t appearing on your level select screen.
On your Scene and Game view you should see many icons like this.
![]()
Now you can hit the Play button and see if it’s is working as expected. After you “complete” two levels you’ll get back to menu screen automatically. Then you can reset your progress using Profile Tool which is located under the menu item Tools → Mad Level Manager → Profile Tool.
Your Own Slide Icons
Notice that if you want to create custom slide icons you have to create Sprite object. To create a sprite you must execute Tools → Mad Level Manager → Create UI → Sprite from the main menu.
![]()
For this sprite you can set a texture and other additional properties:
![]()
When finished you can use it as slide icon in the Grid Layout inspector, or create a new prefab to use it in more than one scene. The decision is up to you!