You may have noticed that MadLevelTester scene has been used in earlier examples multiple times. That is because this is the easiest way to test your newly created level select screen and level configuration. It is also a scene, where you can look into to get to know how Mad Level Manager API actually works. This documentation page will explain in detail how MadLevelTester scene is constructed.
Introduction
First you need to find MadLevelTester scene. It’s located in Mad Level Manager / Examples / Scenes / MadLevelTester:

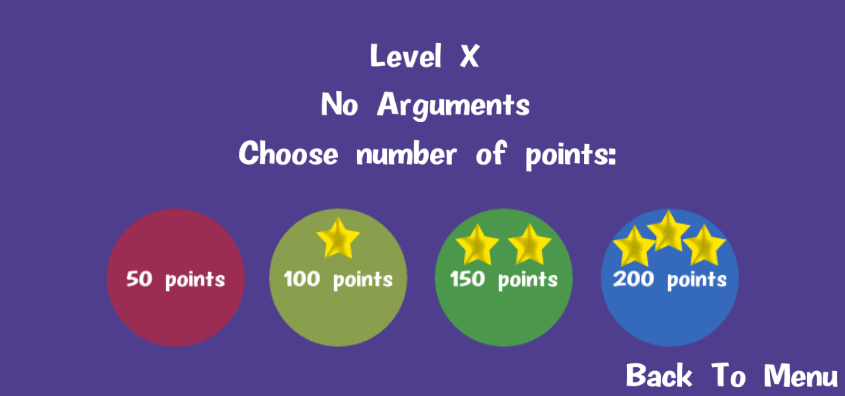
In Game View it looks like this:
All graphics (fonts, sprites) are created using Mad Level Manager UI tools (located in Tools → Mad Level Manager → Create UI menu). The Hierarchy of this scene looks like this:
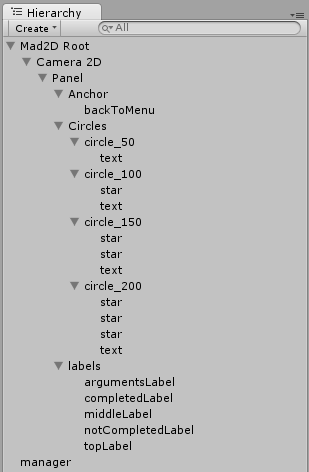
You can see that:
- All graphics is located under Panel object. This is requirement for all UI objects of Mad Level Manager.
- There are 4 circle objects with stars objects within.
- There is manager object to hold manager script.
There also two scripts attached to these objects:
- MadLevelTesterController.cs script that is attached to manager object.
- MadLevelTesterOption.cs script that is attached to all four circles objects.
MadLevelTesterController Script
This one is attached to manager game object, which looks in the inspector like this:
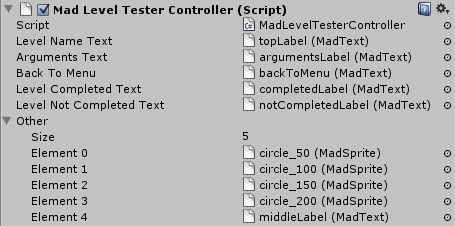
As you can see there’s some objects attached here, it will be explained in a moment. Let’s look at the top of this script:
public class MadLevelTesterController : MonoBehaviour {

    public MadText levelNameText;
    public MadText argumentsText;
    public MadText backToMenu;
    public MadText levelCompletedText;
    public MadText levelNotCompletedText;
    public MadSprite[] other;
There are some public fields, which will reveal themselves in the inspector as seen above. Controller script needs reference to all sprites, because it will eventually hide them when the “level completed” animation will be played. Some of them need to be modified by controller in a specific way, that’s because we have distinction between texts and “other” sprites.
Controller Initialization
Start() code looks as follows:
 1     void Start() {
 2         levelNameText.text = "Level Name: '" + MadLevel.currentLevelName + "'";
 3
 4         if (!string.IsNullOrEmpty(MadLevel.arguments)) {
 5             argumentsText.text = "Arguments: " + MadLevel.arguments;
 6         }
 7
 8         backToMenu.onMouseDown = backToMenu.onTap = (sprite) => {
 9             MadLevel.LoadLevelByName("Level Select");
10         };
11     }
Now you can see why we needed distinction between text and other sprites:
- Line 2 is setting level name using MadLevel.currentLevelName, so it always will display current level name.
- Line 4 is checking for existence of arguments for the current level.
- Line 5 is setting these arguments to argumentsText to be displayed on screen.
- Line 8 is connecting onMouseDown and onTap events of backToMenu label, and it’s making it to return to “Level Select” level on the line 9.
This is all that you need to know about the controller.
Included file info.html not found in _includes directory
MadLevelTesterOption Script
MadLevelTesterOption script is attached to all four icons on the scene. It waits for click and tap events, and reacts to it as it should.
Here how it looks in the circle_100 inspector:

There are 4 circles to distinct 4 different outcomes:
- Will earn 50 points, won’t earn a star, won’t complete the level.
- Will earn 100 points, one star, and complete the level.
- Will earn 150 points, two stars, and complete the level.
- Will earn 200 points, three stars, and complete the level.
Because we’re focusing on star_100, it should earn us 100 points and complete the level. What’s more, completing the level should take us to the next one, but failing will take us back to the level select screen.
Option Fields
Let’s look at the top of MadLevelTesterOption script:
public class MedLevelTesterOption : MonoBehaviour {

    public int points; // number of points that this option gives
    bool completed = false;
To distinct number of points for each circle, you can notice public points field. There also are two helper fields: sprite and completed. These will be explained in a moment.
Option Initialization
 1     void Start() {
 2         var sprite = GetComponent<MadSprite>();
 3
 4         // connect to sprite onMouseDown && onTap event
 5         sprite.onMouseUp = sprite.onTap = (s) => {
 6
 7             // star_1, star_2 and start_3 properties are names or game objects
 8             // that are nested under every icon in the level select screen
 9
10             // note that if you've gained 3 stars already there's no possibility to lost them
11
12             // first star gained when points number is at least 100
13             if (points >= 100) {
14                 EarnStar("star_1");
15                 MarkLevelCompleted();
16             }
17
18             // second star gained when points number is at least 150
19             if (points >= 150) {
20                 EarnStar("star_2");
21                 MarkLevelCompleted();
22             }
23
24             // third star gained when points number is at least 200
25             if (points >= 200) {
26                 EarnStar("star_3");
27                 MarkLevelCompleted();
28             }
29
30             // play animation
31             var controller = GameObject.FindGameObjectWithTag("GameController");
32             var script = controller.GetComponent<MadLevelTesterController>();
33             script.PlayFinishAnimation(sprite, completed);
34
35             StartCoroutine(WaitForAnimation());
36         };
37     }
This also requires some explanation:
- Line 2 gets attached MadSprite component to connect to onMouseUp and onTap events on line 5
- Line 13 checks if points amount is equal or greater than 100, if so EarnStar() method is called, then MarkLevelCompleted(). These two are explained below.
- Notice that on lines 19 and 25 similar things happen. There’s no else clause, because 150 points will earn first, and second star, and 200 points should earn all three. Marking level completed two or three times won’t break anything in this scenario. Notice that earning 50 points won’t earn any star nor complete the level.
- Starting from line 31 end level animation is played.
- On line 35 WaitForAnimation() is called, and this will be explained in a moment.
EarnStar()
This one is very simple:
    void EarnStar(string name) {
        // set level boolean sets level property of type boolean
        MadLevelProfile.SetLevelBoolean(MadLevel.currentLevelName, name, true);
    }
To set level properties like stars, you must call one of the SetLevelSomething() methods of MadLevelProfile. It works just as PlayerPrefs, but it allows to set more specific types and level properties, like completed or locked. In this case boolean property is set. First parameter requires level name that we want to set this property for, so we’re providing current level name. Second one needs parameter name, third parameter value to set. This method is called EarnStar() so value should be always true.
MarkLevelCompleted()
This one is simple too:
    void MarkLevelCompleted() {
        // sets the level completed
        // by default next level will be unlocked
        MadLevelProfile.SetCompleted(MadLevel.currentLevelName, true);

        // manual unlocking looks like this:
        // MadLevelProfile.SetLocked("level_name", false);

        // remembering that level is completed
        completed = true;
    }
Most important call here is SetCompleted(). As explained before, it sets completed flag for the level, which usually unlocks next level in the order. Also we set completed field to true, because we will need this information later in the code.
WaitForAnimation()
The only reason why this is started in coroutine is that there’s animation played in the background that we must wait for.
 1     IEnumerator WaitForAnimation() {
 2         yield return new WaitForSeconds(2.2f); // animation lasts 2 second
 3
 4         if (completed) {
 5             // if level is completed go to next level or to 'Level Select'
 6             // depends of it this the last level
 7             if (MadLevel.HasNext(MadLevel.Type.Level)) {
 8                 MadLevel.LoadNext(MadLevel.Type.Level);
 9             } else {
10                 MadLevel.LoadLevelByName("Level Select");
11             }
12         } else {
13             // if not completed go back to the menu
14             MadLevel.LoadLevelByName("Level Select");
15         }
16     }
If you’re not planing to delay jump to the next level, then don’t think too much about first and second line.
- On line 4 we’re checking if level is completed (field set before).
- If completed, then on line 7 we’re making sure if there’s next level of type Level. Setting correct level type is important to distinguish playable levels from Other or Extra levels.
- If there is next level of type Level, then load it on line 8.
- If there’s no next level, then this it’s time to get back to level select screen on line 10. It’s loaded by its name.
- If this level is not completed, we’re also going back to level select screen on line 14.
- If completed, then on line 7 we’re making sure if there’s next level of type Level. Setting correct level type is important to distinguish playable levels from Other or Extra levels.
Summary
And that’s it! If you’re looking for more resources, you may want to read about Workflow API and Save & Load API.