Level Configuration is the most important feature of Mad Level Manager. Think of level configuration like of Build Settigns window with additional features.
Creating
In order to create a new Level Configuration, just execute Assets → Create → Level Configuration from the main menu or Create → Level Configuration from the Project window menu.
New level configuration will be created in Resources/LevelConfig folder. You can move Resources folder anywhere in your project, but you should keep the hierarchy as is.
Overview
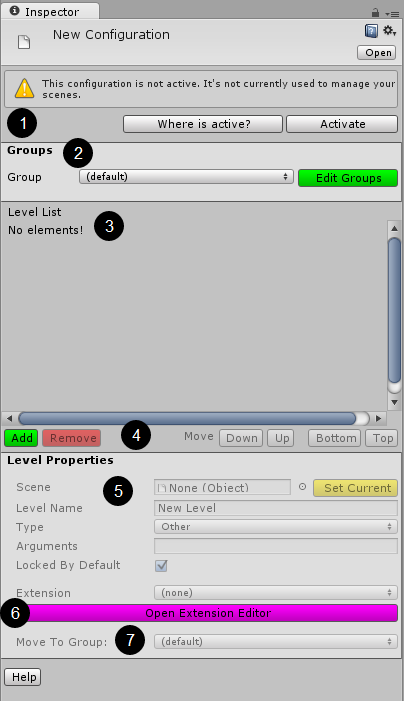
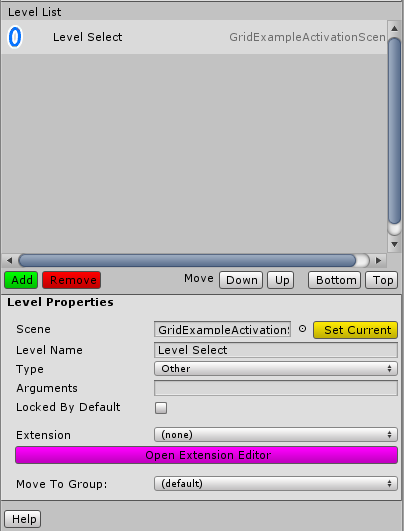
This is how Level Configuration looks like. Let’s describe it from the top:
- The activation warning. Only one configuration can be currently active per project. Clicking on the Activate button will activate currently selected and deactivate other configuration (if there is one).
- Groups settings. Here you can change the group view and edit your groups by clicking on the Edit Groups button.
- Level list displays all of your configured levels in selected group. By default there are no levels configured. Your game needs at least one.
- Level list buttons. Use them to add, remove, or reorder your levels.
- Level properties for each added level.
- Extension properties. Extensions are used to define scenes that should be shown before and after selected level (e.g. loading screens). Read more about extensions.
- Move To Group option will move currently selected levels to different group.
Groups
Groups allows you to create games that have multiple level select screens (one for each group). There is a guideline about how to setup groups mechanics to work properly. Read it to know how to implement it for your game.
In order to add a new group or edit existing groups click on the Edit Groups button. The window will appear:
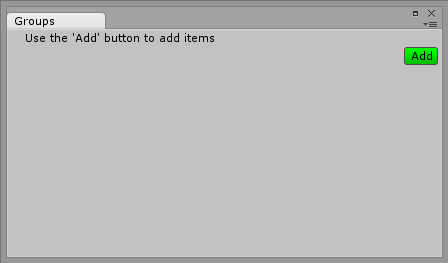
There’s always one group by default that cannot be edited or reordered. This group is called the (default) group and it is not visible on Groups window, although all groups added here will be ordered after the (default) group.
When you will try adding new groups, your window will look like this:
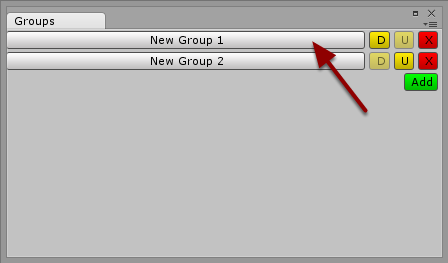
Each group receives a default name which can be changed by clicking on it. You can also reorder your groups by clicking (D)own and (U)p buttons. Use X to remove your group from the list. Removing group with levels will prompt a dialog if you want to move its levels to the (default) group or remove them completely.
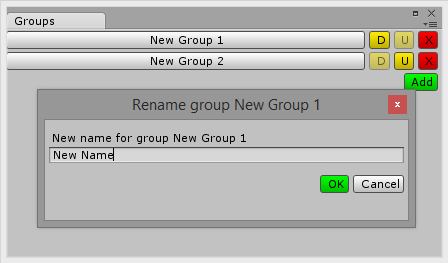
If you will try to rename a group a new window will appear. Just enter a new name, and click on the OK button.
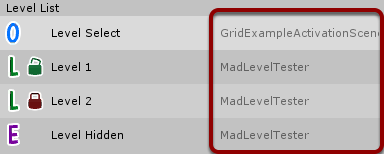
Level list
In order to add a new level, click on the Add button beneath the Level List. You will see a new entry on the list:

Every new level is created with a default name that will not conflict with any other levels on the list, but it may still require your attention. In this case next to the level name you will see three exclamation marks (!!!). This simply means that something is wrong with it. Notice that Level Configurator is suggesting you what may be wrong.
By closer inspection you can notice that Scene object is missing. To fix that you can:
- Find the scene that you want to use for that level and move it to the object field
- Click on Set Current if the scene that you want to use is currently opened
Here you can see that level errors has been fixed by setting the scene object. The level name and level type has been changed too. What’s more, the lock icon has disappeared! Let’s talk about what you can see exactly on the level list.
Level list columns
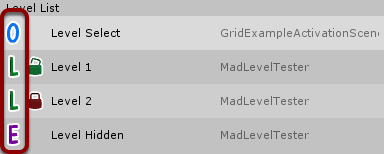
First column is the level type column. O stand for Other, L for Level and E for Extra. Meaning of these types is explained in Level properties section.
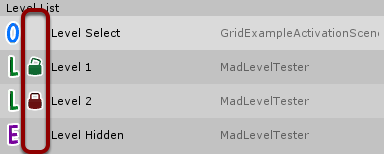
Second column is the locked by default state. Only levels of type Level can be locked.
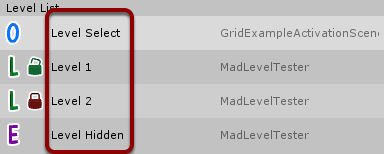
Third column is the level name in the Level Configuration. You should use this name if you want to load this level. Current level name is returned by MadLevel.currentLevelName property.
Last fourth column displays the used scene name. This is only for preview purposes.
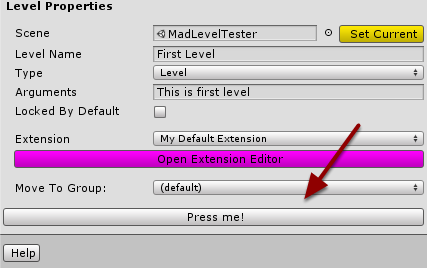
Level properties
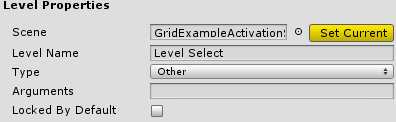
Level properties are available if you select any level on the Level List.
Here you can configure:
Level property – Scene
Scene property needs to be set to scene object that should be used for this level. You shouldn’t worry about the scene name, because from now on you will not use it in any way.
Level property – Level Name
Defines the level name that should be used to load this level. This property is also used as a key for loading/saving game data. Level name should be unique across whole configuration.
To load this level later, use MadLevel.LoadLevelByName(“Level Name Here”) method. Current level name can be acquired using MadLevel.currentLevelName . Read more about the API.
Level property – Type
To understand level types you need to understand why Mad Level Manager is calling levels/scenes as Levels instead of scenes like Unity does. That is because Mad Level Manager allows multiple levels use the same scene.
There are playable levels (actual game levels) and levels that are not actual game levels (more like scenes), but you must also include them in your Level Configuration. That’s why a Level type should be set.
- Level – Use this type for levels that are playable. Level will be displayed on the level select screen.
- Extra – Like Level, but for playable levels that should stay hidden from the player.
- Other – For any other scenes that your game needs (like menus)
Level property – Arguments
Arguments property is a single string. It can be helpful for scenarios when for many levels you’re using the same scene.
As arguments string you can use data file name that should be loaded for the current level. Useful for this purpose may be Resources.Load function.
Level property – Locked By Default
This property is dedicated only for levels of type Level.
Usually your game shouldn’t allow the player to play all available levels from the beginning. Enable Locked By Default property for levels that should be locked when the game is first launched.
When working in Unity Editor you will often need to reset your game state to default. You can do that using the Profile Tool.
Synchronization
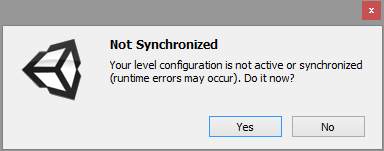
When you will change your levels setup, you may get notified about your Build configuration not in synch with your level configuration.

This simply means that Level Configurator needs to make a change in your Build Settings in order to your game to work properly. Remember that Unity3D requires scene to be added to its Build Settings before it can be loaded. This is all about.
Don’t worry if you forget to do the synchronization. You will be prompted when you will try to hit the play button:
Extending configurator inspector
If you’re familiar with Unity3D editor scripting, you might be interested in extending Level Configurator inspector. Read more about it here.