
Loading Screens Add-on is an extension for Mad Level Manager. It allows you to easily create beautiful level loading screens taking benefit of powerful features of Mad Level Manager.
Mad Level Manager loading screens can display loading progress bars even if you don’t own Unity Pro. The end of loading process can result in “press anywhere to start” message and pressing on it will immediately replace what is visible with the loaded level.
You can prepare loading screen graphics yourself or use one of three beautiful themes that are included in the package.
Mad Level Manager Loading Screens is an extension that can be acquired separately from the Unity Asset Store.
Getting started
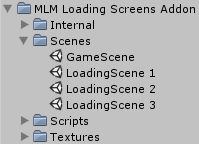
Please make sure that Mad Level Manager (base package) and Mad Level Manager Loading Screens are imported into your project. There should be these two directories visible in your Project window:
- Mad Level Manager
- MLM Loading Screens Addon
Creating a level loading screen
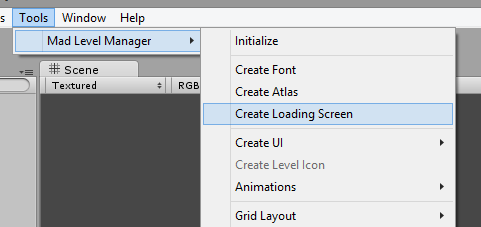
Creating a level loading screen is simple. On the empty scene execute: Tools → Mad Level Manager → Create Loading Screen.
Your scene will be initialized with an example theme.

In the Hierarchy you can notice two important objects.
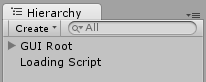
- GUI Root is the root object of Mad2D UI system. You can create UI elements from the Tools → Mad Level Manager → Create UI menu.
- Loading Script is the object that contains the most important Loading Screen script. We will talk about it in a moment.
Using existing themes
If you don’t want to waste time on creating your own level loading screen, or if you’re happy with one of provided themes, you can find them in Scenes directory. There’s also a test level called GameScene. You can use it to check how your playable scene is loaded and paused before it is actually visible.
The Loading Screen script
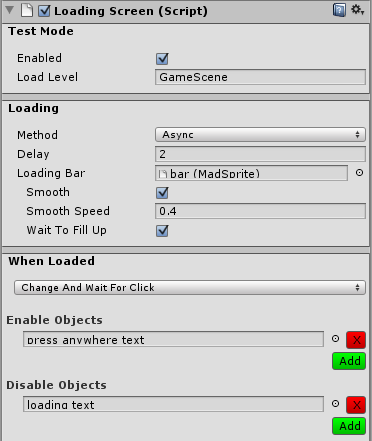
After your scene is set up, you need to configure your Loading Screen script. The Loading Screen script is a pretty simple to comprehend. It should be attached to any game object on the scene. We’re attaching it to “Loading Script” empty game object to make things clearer. This is how its inspector looks like:
Let’s explain it step by step.
Test Mode
The Test Mode is most probably the first thing that you will want to set up. Normally loading screens should be set up as Mad Level Manager Extension. Mad Level Manager will be confused if you will run your game from the extension, so the test mode will allow you to test the loading screen behavior without any particular setup.

- Enabled – Set to true if you want to enable the test mode.
- Load Level – The name of level that you want to load.
Loading
Here is the place how the actual loading should behave.
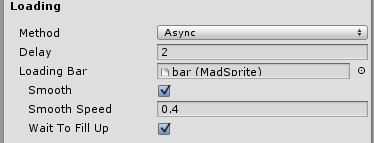
- Method – The loading method.
- Regular – Will load the level using the regular (blocking) loading method. This is the only method that is working for the free version of Unity.
- Async – Will load the level asynchronously. If the Loading Bar is attached, it will display current loading progress.
- Loading Bar – The game object that has a fill value kind variable or property. This can be:
- None – no loading bar will be displayed.
- MadSprite – Mad Level Manager UI Sprite component.
- UISprite (NGUI) – Sprite from NGUI.
- Image (uGUI) – Unity 4.6 uGUI image.
Loading bar settings
- Smooth – Bar filling will be smoothed.
- Smooth Speed – Filling-up factor. For example 0.5 means 50% fill up per second.
- Wait To Fill Up – When level will be loaded before the bar is 100% filled, the loading screen will wait for the Smooth animation to finish.
When Loaded
The last section is responsible to what will happen when the level has been loaded.

When Loaded
You have three options here:
- Show Immediately – Current scene will be replaced at once when the target scene loading has been finished. This is not entirely true when Wait To Fill Up is enabled, because the bar filling-up animation will force a delay.
- Wait And Show – Will pause for X-seconds (new configurable field will appear) before the level will be shown. As before, Wait To Fill Up option may take it’s time.
- Change And Wait For Click – Changed the loading screen appearance (see Enable/Disable Objects) and waits for a single click or touch anywhere on the screen. This is a good option for “Press anywhere to start” notification.
Enable/Disable Objects
In this two lists you can define scene object that should be enabled on disabled when level is loaded. This is useful when When Loaded option is set to Wait And Show or Change And Wait For Click. By changing appearance you can for instance disable “Loading” label and replace it with “Loaded” label. You can also show “Press anywhere to start” label.
Testing your loading screen
- Make sure that your level that is described in Test Mode → Load Level is added to your Build Settings:http://docs.unity3d.com/Manual/PublishingBuilds.html
- Run your scene
When you’re done
- Disable the Test Mode.
- Save your scene
- Create a new extension and add your new loading scene as Load Before Level, so it will be displayed before the actual level is loaded. For more information please take a look here.