Using keyboard and joysticks with select screens
These days, level select screens are mostly associated with touch-screen devices. Starting from Mad Level Manager 2.1.0 you can configure your level select screens to be used with joysticks and keyboards.
To add Input Control script to your current Free or Grid layout, execute Tools → Mad Level Manager → Grid Layout → Add Input Control item for Grid layout or Tools → Mad Level Manager → Free Layout → Add Input Control item for Free layout.
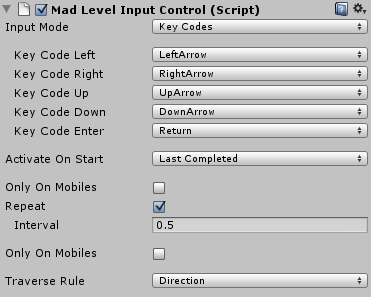
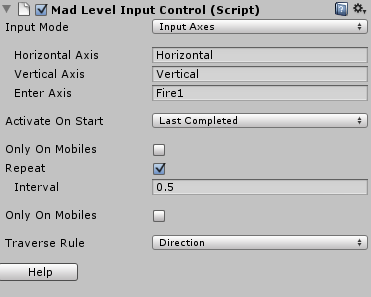
The inspector
Input Control can work in one of two modes:
- Key Codes
- Input Axes
The Key Codes mode uses simple on/off state of predefined Unity Key Codes, Input Axes are using axes defined in Unity Input Manager and generally they are more configurable. It’s entirely up to you which one you use.
Options description
- Activate On Start – allows you to choose which icon will be activated at start.
- Only On Mobiles – makes the Input Control work only on mobile devices.
- Repeat – if key or direction is held down, the input event will be repeated with given Interval.
- Traverse Rule – See below.
Traverse Rule
This one needs some explanation. It defines how player can traverse through levels. You can set it to:
- Simple – only right and left buttons will work. It will simply go to previous or next level in order.
- Direction – it will jump to level icon that it placed at the input direction. Good for free layouts.
- Custom – allows you to write your own traverse rule.
Writing custom traverse rules
If you’re familiar with C#, you can write your own traverse rule. In order to do that, you have to implement MadLevelInputControl.TraverseRule abstract class.
The TraverseRule class has 4 abstract methods and capabilities that can be used to set which direction can be used in traverse action. Here are abstract methods:
public abstract MadLevelIcon LeftIcon(MadLevelIcon current);
public abstract MadLevelIcon TopIcon(MadLevelIcon current);
public abstract MadLevelIcon RightIcon(MadLevelIcon current);
public abstract MadLevelIcon BottomIcon(MadLevelIcon current);
Here’s an example of SimpleTraverseRule class that is used as a Simple traverse type:
public class SimpleTraverseRule : TraverseRule {

    public SimpleTraverseRule()
        : base(Capability.CanGoLeft, Capability.CanGoRight) {
    }

    public override MadLevelIcon LeftIcon(MadLevelIcon current) {
        var layout = MadLevelLayout.current;
        return layout.GetPreviousIcon(current);
    }

    public override MadLevelIcon RightIcon(MadLevelIcon current) {
        var layout = MadLevelLayout.current;
        return layout.GetNextIcon(current);
    }

    public override MadLevelIcon TopIcon(MadLevelIcon current) {
        throw new System.NotImplementedException();
    }

    public override MadLevelIcon BottomIcon(MadLevelIcon current) {
        throw new System.NotImplementedException();
    }

}
As you can see the constructor is setting capabilities that this traverse rule can go only left and right. In this case methods TopIcon() and BottomIcon() may not be implemented at all.