Mad Level Manager animation system allows you to customize how your level icons should behave during certain actions. It’s designed in a way to allow you to add juicyness to your level select screens with minimum effort.

Adding animations
Animations can be added to any objects on your scene (with some exceptions), but the best result can be achieved when combining them with MadSprite or MadLevelIcon (level icons) components. The easiest way to add an animation is through the menu: Tools → Mad Level Manager → Animations.
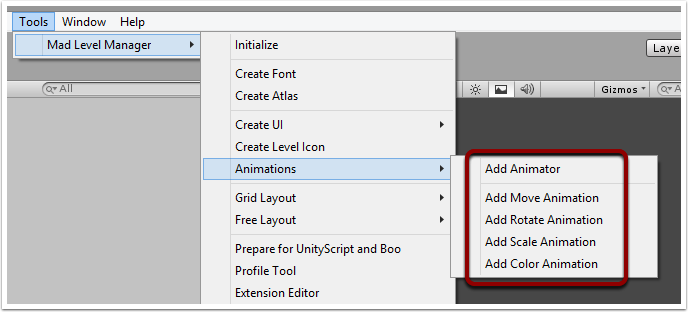
There are 4 types of animations and an Animator component. We will discuss the Animator further on. The 4 animation types are as follows:
- Move
- Rotate
- Scale
- Color
All except the Color animation type can be added to any game object. Color animation requires MadSprite or MadLevelIcon components to be present.
Animation components
All animation inspectors are very similar, however they have some obvious differences. Here’s how scale animation inspector looks like:
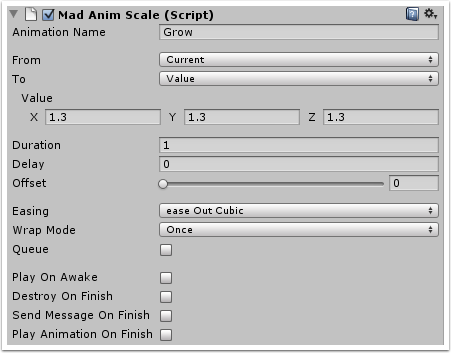
- Animation Name – All animations have their name so they can be called from other components or scripts. You can call multiple animations with the same name so all of them will be played at once.
- From – To – Start and end animation values. There are some natural differences in these options between different animation types. Let’s explain these options:
- Current – The value of the object in the moment of the animation start.
- Origin – The value of the object when the scene has been launched.
- Value – Defined value (value input will be displayed).
- Current Add (only for some animation types) – Adds Current value to given value.
- Origin Add (only for some animation types) – Adds Origin value to given value.
- Current Multiply (only for some animation types) – Multiplies Current value by a given value.
- Origin Multiply (only for some animation types) – Multiplies Origin value by a given value.
- Local Current Add (only for some animation types) – Adds local-space Current value to a given value.
- Local Origin Add (only for some animation types) – Adds local-space Origin value to a given value.
- World Current Add (only for some animation types) – Adds world-space Current value to a given value.
- World Origin Add (only for some animation types) – Adds world-space Origin value to a given value.
- Duration – Animation duration in seconds.
- Delay – Wait time between an animation play request and an actual launch.
- Offset – Percentage offset of animation progress on the animation start (0.0 – 1.0).
- Easing – iTween-type animation easing for different kinds of movements.
- Wrap Mode – How animation should behave when reaching an end of animation progress.
- Once – Animation will finish after a single run. Only this option will trigger the animation finish event.
- Loop – Will start over when the animation end is reached.
- Ping Pong – Goes forwards and backwards repeatedly.
- Clamp Forever – Will stop at the end frame and never finish.
- Queue – Usually when you start an animation when different animation of the same type is running, this other animation will be stopped. Use this option to tell the current animation to wait until the other one is finished.
- Play On Awake – Start playing when the component is awaken.
- Destroy On Finish – Destroys current game object when this animation is finished.
- Send Message On Finish – Send a message to a given object when this animation is finished.

- Receiver – Receiver object that you want to send your message to.
- Method Name – Message name that you want to invoke.
- Play Animation On Finish – Plays another animation when this one is finished.

- Name – Animation (group) name that you want to play.
- From The Beginning – Forces the animation to play from the beginning.
Animator component
What makes Mad Level Manager level icons animation awesome is the Animator script. Animator allows you to configure on which events animations should be played, and even modify level icons animation values on the fly based on their position on the screen.
MadLevelAnimator component can be added only to game objects which have a MadLevelIcon component. MadAnimator component that offers a little less functionality can be added only to game objects that have a MadSprite component. Use Tools → Mad Level Manager → Animations → Add Animator menu item to always add the right version to your selected game object.

Events section
Here you can configure on which events animation should be played and stopped.
- On Mouse Enter – When a mouse pointer enters the sprite area.
- On Mouse Exit – When a mouse pointer exits the sprite area.
- On Touch Enter – When finger enters the sprite area (touchable devices).
- On Touch Exit – When finger exits the sprite area (touchable devices).
- On Focus – When the sprite gains focus (click or tap).
- On Focus Lost – When the sprite loses focus.
- On Level Locked – Executed when level icon state is locked.
- On Level Unlocked – Executed when level icon state is unlocked.
After expanding any of these options you will see something like this:
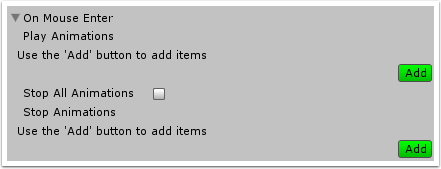
There are two lists:
- Play Animations – Animations to be played.
- Stop Animations – Animations to be stopped.
Before Stop Animations there is an option called Stop All Animations. Enable it to stop all currently playing animations.
When you decide to add an animation element, the inspector will expand even further:
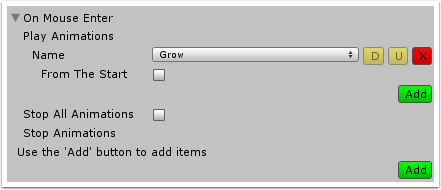
Here you can choose animation Name. This is the list of animations that are attached to this game object. You can also force any animation to play From The Start.
Modifiers section
Modifiers are properties that will change your icon instances animation settings based on property like level index or grid position. In that way you can create an icon template that will start its animation with delay based on order. Using modifiers in this kind of scenarios is very useful because what you’re preparing is a single icon prefab and you don’t have direct access to each icon instance.
There are two groups of modifiers:
- Delay modifiers
- Offset modifiers
Delay modifiers will change the Delay parameter of your animations. Offset will do the similar to the Offset parameter.
You can add any number of Delay or Offset modifiers. For each one you have to define:
- Name – Animation (group) name that you want this modifier to be applied to
- Function – There are two modifier functions available:
- Predefined – Can be set from the inspector without programming skills.
- Custom – Requires you to write your own modifier method.
- Base Operator – What to do with computed expression value.
- Add – Adds it to modified parameter (parameter = parameter + computed_expression_value).
- Subtract – Subtracts it (parameter = parameter – computed_expression_value).
- Multiply – Multiplies it (parameter = parameter * computed_expression_value).
- Divide – Divides it (parameter = parameter / computed_expression_value).
- Modulo – Computes modulo (parameter = parameter % computed_expression_value).
The expression
The expression consists of three parameters. There are:
- Left-side value
- Operator
- Right-side value
Left-side value can be one of follows:
- Level Index – Current level index. For level 1 it will be 0, for level 2 → 1, etc.
- Grid Level Page Index – (grid-only) Level index but on the current grid page. If your grid has dimensions of 3×3 then first 9 levels will have values 0-8, the 10-nth level will start over with 0.
- Grid Row – Grid row on which level icon is placed (starting from 0).
- Grid Column – Grid column on which level icon is placed (starting from 0).
Right-side value is a custom value that can be adjusted to your needs.
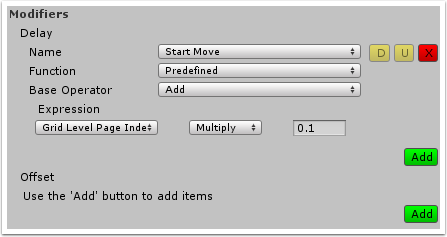
Expression example
On the screenshot above, there is an expression that multiplies Grid Level Page Index by 0.1. Then it *Add*s its value to Start Move animation Delay parameter.
Let’s assume that Start Move animation Delay equals 0:
- Level 1
- Expression = Grid Level Page Index * 0.1 = 0 * 0.1 = 0
- Offset = Offset + Expression = 0 + 0 = 0
- Level 2
- Expression = Grid Level Page Index * 0.1 = 1 * 0.1 = 0.1
- Offset = Offset + Expression = 0 + 0.1 = 0.1
- Level 3
- Expression = Grid Level Page Index * 0.1 = 2 * 0.1 = 0.2
- Offset = Offset + Expression = 0 + 0.2 = 0.2
Custom modifier method
If you decide to set Function property to custom then you’re responsible for providing a modifier function. Here’s an example code:
var animator = GetComponent<MadLevelAnimator>();
var delayModifier = animator.delayModifiers[0]; // for 0-indexed delay modifier
delayModifier.customModifierFunction = (icon) => { // MadLevelIcon is passed as a parameter
	return icon.transform.x; // example return value
};
Startup properties section
Startup properties allow you to change objects positions, rotation, and the scale on the scene starts without modifying the Origin (so you can later use the Origin property to get the value before the modification). You may want to use these properties to move your icons away from the screen to animate them to their origin positions later.

For each property you can define how you want to change it:
- Do Not Change – doesn’t change anything.
- Add – Adds a given value to the origin value.
- Multiply – Multiplies a given value to the origin value.
- Set – Sets the value to a given value.
Working example
All the above can be reviewed and tested in the GridExampleActivationScene scene. All animations and the animator are defined in the icon2Prefab object. See it for yourself!